Installation
npm install still running… please hold.
Windows users: Install WSL first
If you're on Windows, you'll need to install Windows Subsystem for Linux (WSL) before proceeding. See the WSL installation section below.
Windows Subsystem for Linux (WSL)
MacOS users can skip this section
MacOS is UNIX-based, so you can jump straight to installing package managers.
Install Windows Subsystem for Linux (WSL).
Enable Windows Features
Enable essential Windows features to enable WSL.
Win+R to open Run dialog, then:
optionalfeatures # opens 'Windows Features' DialogTurn on the following features if not already enabled.

Restart your machine for these changes to take effect.
After restart, launch 'Microsoft Store', and search 'Linux'.

Create Your UNIX Account
Keep your password short and simple for now. You'll need to type it often to install packages.
Don't forget your UNIX username & password
You'll be locked out and will have to re-install WSL.
Enter new UNIX username: user
New password:
Retype new password:
passwd: password updated successfully
Installation successful!
To run a command as administrator (user "root"), use "sudo <command>".
See "man sudo_root" for details.

Welcome to Ubuntu 24.04.1 LTS (GNU/Linux 5.15.167.4-microsoft-standard-WSL2 x86_64)


Documentation:  https://help.ubuntu.com/
Management:     https://landscape.canonical.com/
Support:        https://ubuntu.com/pro

System information as of Tue Dec 17 15:29:19 EST 2024

System load:  0.16                Processes:             49
Usage of /:   0.1% of 1006.85GB   Users logged in:       0
Memory usage: 5%                  IPv4 address for eth0: 172.19.92.39
Swap usage:   0%


This message is shown once a day. To disable it please create the
/home/user/.hushlogin file.
user@MSI:~$
Configure Terminal Settings
Ctrl+, to open settings, and set the default profile to Ubuntu.

Close the terminal and re-open it with: Win+X, I
You should see:

Update the system:
sudo apt update && sudo apt upgrade -yStruggling with linux commands? Check out our Linux Cheats for a quick reference.
Install Package Managers
Clean and Install pnpm
Clean existing system files. You can always re-install these later.
sudo rm -rf "$(which npm node pnpm)" "$(where npm node pnpm)"Pnpm
curl -fsSL https://get.pnpm.io/install.sh | sh -Why we use pnpm
We use pnpm instead of npm because it is faster, more efficient with disk space, and enforces stricter dependency management.
Unlike npm or yarn, pnpm uses a content-addressable store and hard links, which means packages are downloaded once and reused across all projects — saving both time and storage.
It also prevents phantom dependencies by ensuring that only explicitly listed packages are accessible, leading to more reliable builds.
👉 Want to dive deeper? Check out the official pnpm documentation.
Re-open the terminal once installation is complete.
Set Node.js version.
pnpm env use --global 22.17.1 # latest LTS at time of writingUse the latest Node.js LTS
We recommend using the latest LTS version of Node.js.
Check nodejs.org for the latest version before installing.
Configure GitHub CLI
Create a GitHub account if you don't already have one.
  # Install GitHub CLI (gh) on Ubuntu/Debian
  sudo apt update
sudo apt install gh -y# Install GitHub CLI (gh) on MacOS
brew install gh # Login with your GitHub account.
gh auth login
Navigate to the github link shown and paste in the code as usual.

Provide the following answers if prompted.
? Authenticate Git with your GitHub credentials? [Use arrows] to move, type to filter]
> Yes

# Your one-time code will be different.
! First copy your one-time code: 95i2-DAE6
Press Enter to open github.com in your browser...
Return to the terminal when you see the Congratulations, you're all set! screen.

You should see the following:
✔ Authentication complete.
- gh config set -h github.com git_protocol https
✔ Configured git protocol
✔ Logged in as yourgithubusername
Set Your Git Identity (Required)
Git needs your name and email to attach to every commit you make. Without this, you'll see errors like "Author identity unknown" or "Please tell me who you are" when you try to commit—especially if you're using lazygit.
Run these commands to set your identity globally:
git config --global user.name "Your Name"
git config --global user.email "you@example.com"
Verify it worked:
git config --global --get user.name
git config --global --get user.email
Privacy tip
If you'd rather not expose your real email, you can use GitHub's private "noreply" email address. Find it in your GitHub email settings under "Keep my email addresses private".
Install lazygit
lazygit is a terminal UI for git that makes commits, branches, and rebases much easier.
brew install lazygitsudo apt install lazygitFor the latest version, grab a binary from lazygit releases.
sudo dnf copr enable atim/lazygit -y && sudo dnf install lazygitsudo pacman -S lazygitscoop install lazygit
# or
choco install lazygitIf your distro isn't listed, check the official releases page.
GitHub SSH Setup (Recommended for Pushing)
If you plan to push code using git push or lazygit (not just gh CLI), setting up SSH keys prevents Permission denied (publickey) errors.
Already using gh auth?
gh auth login handles authentication for the GitHub CLI, but SSH keys are still needed when pushing via regular git commands or lazygit with an SSH remote.
1. Generate an SSH key:
ssh-keygen -t ed25519 -C "your_email@example.com"Press Enter to accept the default location (~/.ssh/id_ed25519). You can set a passphrase or leave it empty.
Keep the default filename
Don't rename the key file unless you know how to configure SSH to find it. Stick with id_ed25519.
2. Start the SSH agent and add your key:
eval "$(ssh-agent -s)"
ssh-add ~/.ssh/id_ed25519
3. Copy your public key:
cat ~/.ssh/id_ed25519.pubCopy the entire output.
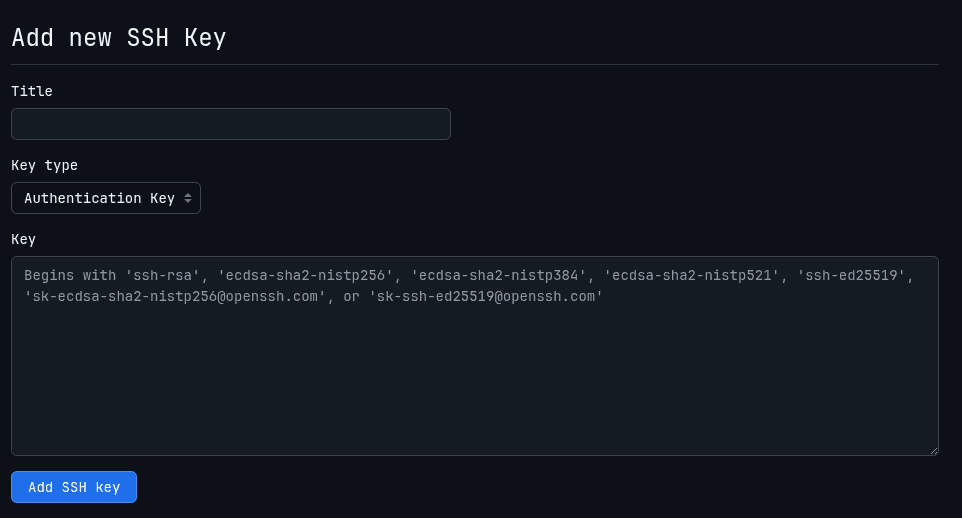
4. Add the key to GitHub:
Go to GitHub → Settings → SSH and GPG keys → New SSH key. Paste your public key and save.
5. Test your connection:
ssh -T git@github.comYou should see a message like "Hi username! You've successfully authenticated..."

6. Check your remote URL:
git remote -vIf it shows https://github.com/... and you want to use SSH, switch it:
git remote set-url origin git@github.com:OWNER/REPO.gitReplace OWNER/REPO with your fork (e.g., yourusername/arc-docs).
Fork and Clone the Repository
# Fork and clone the ARC docs repo to your GitHub account, then open it
gh repo fork Autonomous-Robotics-Carleton/arc-docs --clone
cd arc-docs
cd 2025
pnpm dev # start the dev server
Open VSCode (Or your preferred editor):
# Allow all hosts and trust the authors when you see a popup
# And install all recommended extensions
code .
Project Structure
After cloning, you'll find this structure:
Required Tools Summary
Prop
Type
Verify Your Setup
Before diving in, run these quick checks to make sure everything is configured:
# Git identity set?
git config --global --get user.name
git config --global --get user.email

# SSH key exists?
ls -la ~/.ssh

# SSH agent has your key?
ssh-add -l

# GitHub connection works?
ssh -T git@github.com

# lazygit installed?
lazygit --version
If any of these fail, revisit the relevant section above.
Troubleshooting
Get Involved
Looking to contribute? If you've already read the Overview then head on over to the Contribution Guidelines.
Connect With Us
Connect on our channels and with the cuHacking team to ask questions, get help and keep up to date with the latest events.
- ⭐ Star us on GitHub to show your support.
- Join our Discord Community.
- Follow us on Social Media.
Welcome to Arc
ARC (Autonomous Robotics Carleton) is a new club established at Carleton University, Ottawa, Canada in 2025. The club focuses on engineering an autonomous RC car, and having it compete in races against other autonomous RC cars.
Getting Started
Why read docs when you can just read the code?